Not all grid systems are made the same!

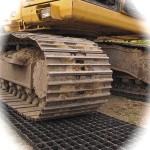
Gridforce offers a unique and revolutionary tile system made of 100% recycled plastic to provide ground reinforcement to multiple surfaces.The tough grids can be laid above or below the ground level and then filled with either stone or earth, or can even be seeded. Gridforce’s uses range from large industrial applications covering thousands of squared metres to small DIY driveways.Their design means that they are extremely easy to install and provide a cost-effective solution to what would have been more expensive if it were to be concreted or paved. Offered as either a temporary or permanent solution, the tiles are designed to give a firm surface that will not sink, rut or shift once installed.
Caring for the environment
Gridforce reduces your carbon footprint:- Drains to water table, relieving pressure on sewer systems
- Complies with sustainable drainage best practice
- Manufactured from 100% recycled plastic
Gridforce drainage
The video below demonstrates just how effectively Gridforce can drain rainwater away from the surface compared to a traditional asphalt surface. These were both taken during the same downpour here in Guernsey.
There are many reasons to use Gridforce:
- Gridforce is the best product on the market.*
- Gridforce is quick & easy to install at 100m2 per man-hour.
- Gridforce is made from 100% recycled plastic – the planet is important!!
- Gridforce is high strength – up to 400 tonnes per m2, twice that of our competitors.
- Gridforce is made of LDPE – its more flexible and durable than its competitors.
- Gridforce is maintenance free.
- Gridforce is self draining – no need for drainage systems.
- Gridforce does not require planning permission unlike other driveway finishes.
- Gridforce ideal for DIY installation, keeping costs to a minimum.
Features
- Manufactured from recycled plastics
- Low transport and handling costs
- Withstands frost and UV radiation
- 3 sizes: GF30, GF40 and GF50
- High strength (up to 400 t/m2)
- Patented interlocking system
- Fit and forget product
- Tough and durable
- Maintenance free
- 100% recycled
- Lightweight
Advantages
- No maintenance
- Colours available
- Load capacity TUC Approved
- Three systems fully integrate
- Weight capacity up to 400 per m2
- Tiles expansion self contained
- No additional expansion joints
- Speed of laying, 100sqm per hour/per man
- Interlocking system proven and strong (no pegs)
- DIY, no skills required keeps cost to a minimum
- Cost effectiveness against other materials (paving, tarmac etc)
Benefits
- Up to 20 tonnes axle load in accordance with DIN 1072
- Creates surfaces suitable for taking heavy vehicles
- Resistant to water, corrosion and cracking
- Withstands frost and UV radiation
- Low transport and handling costs
- Prevents erosion and wear
- Does not expand
Installation
Installing a Gridforce driveway is extremely straight forward. You receive pre-connected sections that can be taken straight from the pallet and installed by just one person in a single step.
1Geo-textile
Geo-textile membrane should first be laid on the earth before the base layer to create ground stability.
2Base Layer
To ensure optimum drainage, crushed concrete/broken stone of a size 5/32mm should be used in the base layer. In normal circumstances, the sub-base underneath the grid should be made up of approx. 150mm of hardcore. However, if the ground in your case is particularly soft we would recommend that you satisfy yourself that the sub-base is capable of withstanding the desired amount of weight.
We have had customers with a soft clay ground use up to 200mm of hardcore as the ground required a deep sub-base. Ideally, this should be compacted with a roller or compactor to create a firm and level surface.
3Levelling Layer
To level any possible unevenness in the base layer, the Gridforce system should be installed on a layer of fine chippings or sharp sand approx. 25mm deep. This should be levelled evenly with a rake.
4Gridforce
Lay the chosen Gridforce onto the surface and firm into the ground.
5Filling
Gridforce can be filled with a wide range of materials, most commonly seeded topsoil for a grassed finish or with gravel. For grass seeding we recommend a good quality top soil, screened loam or root zone. Fill the grid so that the upper edge of the Gridforce is 5mm above the soil then soak and seed, whereas for gravel the top of the grid may be completely covered.
For a gravel finish, we would not recommend using a gravel below 10mm in size. If the area is not exactly rectangular, the grid can be cut to shape with a hand saw/stihl saw but obviously this will require purchasing extra stock and then cutting down to the right size. The grid will function effectively on a slope up to 1:5 if trafficked and 1:3 untrafficked.
Separating Sections/Layers
If a section of grid needs to be separated, place it at the point of separation on a higher surface (another layer of Gridforce works best), and push it out of the connecting system using your foot.
Calculations for Quantities
Hardcore/Broken Stone required for the base layer
- For cars = 300kg of hardcore/broken stone per m² (providing 150mm depth)
- For trucks = 400kg of hardcore/broken stone per m² (providing 200mm depth)
Sand or Fine Chippings required for the leveling layer
- For all grid types = 25kg of sharp sand (grass or gravel finish) or fine chippings (gravel finish only) per m²
Topsoil required for a grass surface (per m2)
- For 30mm grid = 50kg of topsoil
- For 40mm grid = 65kg of topsoil
- For 50mm grid = 80kg of topsoil
Aggregate required for a graveled area (per m2)
- For 30mm grid = 55kg of gravel
- For 40mm grid = 72kg of gravel
- For 50mm grid = 90kg of gravel
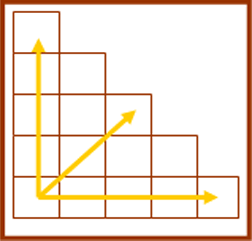
Gridforce Laying Diagram
Prepare the underground according to the use. Start to lay the Gridforce in the left corner and lay it step by step:


